Your cart is currently empty!
Camping Equipment
Views: 0
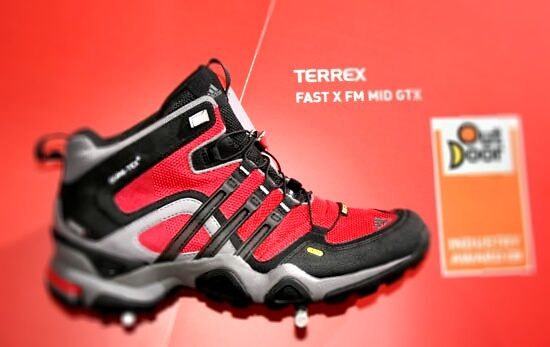
Adidas renewed its commitment to the outdoor industry just about 3 years ago. Now the world’s second-largest sporting goods maker is getting excited about outdoor gear.
According to Rolf Reinschmidt, the senior vice president and head of global outdoor unit, outdoor gear “has bee on of the fastest growing categories within the Adidas group in 2010 and that trend is clearly expected to continue.
They’ve not even entered the US market yet which is expected to be $10 billion of annual sales.
Imagine Adidas sleeping bags, sleeping pads, tents and backpacking packs. The market will likely have high expectations for Adidas.

TreeHugger founder Graham Hill is trying to radically reduce his footprint and live happily with less space, less stuff and less waste on less money, but with more design. He calls it “LifeEdited.”
So what does one learn from camping equipment? What Graham Hill calls LifeEdited is what camping equipment is all about. Take camping chairs as an example; they’re fold small, often use minimal raw materials and cheap, all of which is achieved through great design.
Here’s another example:
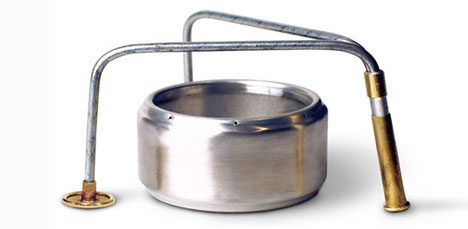
There is a lot to learn from camping equipment. Most kitchen stoves weigh in at a couple of hundred pounds of steel and take up 5 square feet of space, or over 1% of Graham’s apartment. Yet Warren has shown us a stove that weighs less than an ounce. It is perhaps a bit minimalist, but what happens when you think of living like you are camping at home? It particularly makes sense when you have a sixth floor walkup.
Using camping equipment at home can save you a lot of space and probably some money as well and if you feel like camping, you can just use what you already have at home. It’s a win-win option.
Read more at Treehugger.
Do Epic Shit! That’s what it says on the cool handmade coffee cozy by the knotworkshop. Of course, how you define epic is up to you. You’re in the outdoors, it’s where epic stuff happens so get on with it. The power boost from your coffee helps.

You can get one here at the knotworkshop. You might also want to check out some cool camping coffee stuff because you need a good cup of joe to do some epic shit.
Making coffee is easier than ever, if you have the right gear that is. Here’s the top ten camping coffee gear in 2010:
- Aerobie Aeropress
- Bialetti Moka Express Stovetop
- Bodum Columbia Thermal Press Pot
- Finum Brewing Basket
- Planetary Design Double Shot Travel French Press Mug
- Coleman Camping Coffee Maker
- Mypressi Twist
- Handpresso
- Thermos Leak-Proof Insulated Travel Mug
- Planetary Design Airscape
You can find these camping coffee gear here.
My personal favorite is the Bear Bag. Maybe it will keep us safe from the recent rise in bear attacks.

Here are some of the gear found at Outdoor Retailer Summer by the GearJunkie crew:
- Petzl GRIGRI
- SteriPen Sidewinder
- The North Face DryWall tent
- Helly Hansen Rainwear
- Women’s Cirrus Wind Top by Rab
- Earthkeepers Cupsole Sport Boat Shoe by Timberland
- Wenger EvoWood
- Patagonia Athletic Dresses
- Brooks-Range Mult-Functional Plier
- Sperry Top-Sider
- Gerber’s Bear Grylls Survival Series Ultimate Knife
- Stunt Puppy Collar
For further details go the GearJunkie.
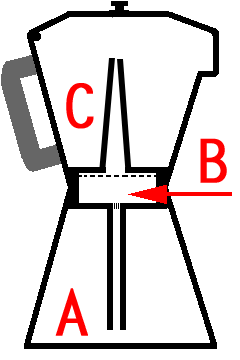
I’m not a fan of coffee percolators but sometimes it’s hard to resist the bubbling sound that comes from the coffee in a percolator. The reason I prefer the french press is because not only does it make a perfect cup of coffee, it’s also much less of a hassle and cheaper too.
In case you didn’t know what a coffee percolator is, it’s a type of pot used to brew coffee as pictured above. The bottom section (A) is where you fill in with hot water. The water level should at least be above the bottom tube but not more than usually indicated on the pot, depending on how many cups of coffee you want to make. The middle section (B) is where all the ground coffee goes. The top section (C) is should be empty initially and that’s where the final product goes.
To use the percolator once you have filled the water up to the required level and put in some quality ground in the middle chamber (2 spoons per cup of coffee or however you like it), first boil the water by heating up the pot on the campfire or camp stove. Once the water has boiled, put the pot on the edge of the fire or turn the camp stove on low. Pressure will build up in the lower chamber (A) until there is enough to push the hot water through the spout and through the coffee grounds.
Allow to percolate slowly for 5 to 10 minutes. The resulting coffee is collected in the upper section (C). You can then remove the middle chamber and discard the grounds.
It’s now time to pour the coffee into your favorite camping mug and enjoy.
Note:
Definition of per·co·late: (of a liquid or gas) Filter gradually through a porous surface or substance
You might also be interested in other camping coffee gear.
Tents have come a long way since the classic A-frame tent. They’re stronger, lighter, roomier and have more features. Camping tent designs can be silly sometimes but most of the time they’re very good ideas. Tents like these, I think, are a preview of what’s to come in the future, at least some of them. I predict a few of them will be successful and some will evolve into different variations.
Here are some of the most unique tent designs today (one of them is not really a tent):
MyHab

Tent Dresses

Abrio Socio

Kahuna

See more amazing tent designs.
 A Double Wall Tent
Single-wall tens, as the name suggests, are tents that only have a single wall that acts as a barrier against the weather. Double-wall tents are tents with an inner mesh wall covered by a waterproof rainfly. Both can be used for backpacking. But which one is right for you?
There are 5 reasons why you’d want to choose Single-Wall Tents:
- You don’t mind getting wet in the middle of the night when it starts to rain on you from the inside soaking your sleeping bag and pad
- You’re camping in a dry environment where condensation is not very likely.
- You love to keep your backpack light so you can hike further, faster and with less effort.
- They’re cheaper than double-wall tents
- They’re much easier to set-up than double-wall tents
And there are 5 reasons why you should choose Double-Wall Tents:
- You’re only happy when you sleep dry
- The extra weight is worth having a good night’s sleep
- You’re going to camp in a humid environment
- There’s no backpacking involved
- You can afford a double-wall tent that’s lighter than some single-wall tents
For more information, read Single Wall Tents and Double Wall Tents.
You can mimic a double-wall tent with a bivvy and a tarp tent.

If you want to avoid expensive baggage fees the first thing you need to do is the reduce the amount of stuff you carry. Here are some tips courtesy of Cheapflights.com:
- Consider renting camping gear if available at the destination.
- Pack easy-to-dry clothing, lightweight and breathable clothing but be prepared for all weather conditions.
- Be sensible with your choice of clothing. Don’t pack a down jacket if it’s going to be hot.
- Get some micro fiber towels. They’re super absorbent, fast-drying and they pack small.
- Pack recipes for some easy-to-cook one-pot meals and lightweight camping cookware. Multi-functional cookware works best.
- If you’re a pillow person, pack an inflatable one. Otherwise stuffing your clothes into a stuff sack works too.
Other things you should be aware of:
- Camping stoves are allowed in checked luggage but the fuel is not.
- You can’t carry a lighter on you of most flights.
- Sharp items like a camping knife are allowed in checked luggage.

The very sleek KOR ONE water bottle was featured in Ironman 2 so there’s a high cool factor there. If you’re backpacking, the slim design makes it fit easily into the side pockets of your backpack. It’s also BPA free.
Check out some of the reviews on this high quality water bottle:
You can get the KOR ONE from Amazon.
Eta Stoves are heat exchanger cooking systems that focus cooking efficiency. This results in fast cooking times, low fuel consumption and a lighter cooking system overall.
The newest member of the Eta family, EtaSolo, is the lightest so far at just under 13 ounces (365 grams) beating EtaExpress which weighs 16.1 ounces (456 grams). It looks similar to the EtaExpress but the lid does not double as a frying pan.
Primus also improved the heating efficiency from the EtaExpress thanks to the increased surface area of the bottom of the pan and better protection of the burner against the wind. It also has an insulating cover that slows down heat loss. Primus claims that the EtaSolo can cook with a 3.5 oz gas canister for a whole hour.
Go to the Primus site for more info.
Mountain Equipment has prepared some cool new outdoor gear for spring 2010:

For more details go to OutdoorsMagic.com
The guys at CampingGearTV did a video entitled “What to Pack in Your Camping Chest”. It’s a bit long at 8 minutes 43 seconds and you might not like going through the video and finding out that there’s a part 2 to it so here’s a list of what’s inside their camping chest:
- Sunscreen
- Propane Canister
- Propane Stove
- Portable Spotlight
- Big Plastic Water Jug
- First Aid Kit
- Paper Plate Holders
- Disposable Utensils
- Spatula
- Beer Bong
- Plastic Cups
- Beer Cozy with Neck Strap
The simple answer to this is the number of walls. 2 vs 1. But what does it imply?
It’s not just that 2 walls keep you warmer than 1 wall in cold weather, double wall tents are known to keep you dry even better than single wall tents. This is because in a double wall tent, the fly keeps the rain and snow at bay while the inner tent expels the moist air so that it condenses on the fly (in cases ventilation doesn’t do the trick) which then drips to the ground instead of the user.
 A single wall tent has to rely on one wall to do both i.e. deal with moisture from inside and outside. So the fabric has to be waterproof and breathable. Breathable fabrics may not be enough to battle condensation effectively so you have to rely on venting.
The upside to single wall tents is that they’re lighter and less bulky. Double wall tents have more parts and hence heavier and bulkier.
Outdoor Research: How to Setup A Bivy Sack from Outdoor Research on Vimeo.
“Bivy sacks are great solo lightweight shelters which can also be carried as a backup emergency shelter. Today we are going to talk about Outdoor Research’s Advanced bivy, which includes 2 poles. It’s a two pole system designed to keep the bivy material off your face.
As you’re thinking about setting up your bivy, first off, you would want to choose an appropriate site. Make sure the area is clear of sharp rocks or other debris that might puncture the fabric of the bivy sack.
Once you’ve done so, go ahead the pull the sack out of its pack and set up its poles. So you’ve got two different poles, one longer than the other. The longer pole is going to go on the inside of the white sleeve. Connect the end pieces at both ends and connect them to the corresponding snaps.
The shorter pole goes into the grey sleeve on the outside. Connect the end pieces at both ends and snap them into place. The sack is now ready.”
There are two straps inside the sack that you can use to strap in your camping mattress. The one used in the video is probably an Exped DownMat 9 by Outdoor Research.
There a variety of configurations you can choose from. The video shows all the possible combinations.
To tell you the truth I’d much rather buy my down sleeping bag or quilt because I’m not the kind of guy who would do this thing. If you’re interested, backpackinglight.com made an article with great detail on how you can make one yourself.
It costs around $50-$250 to make and weighs around 550-900 grams. Contruction time amounts to 10-15 hours if you know what you’re doing. The article covers:
- Materials
- Sources of materials
- How much of material is required
- Stuffing
- Quilt design
- Construction details
[media:http://www.youtube.com/watch?v=vvkTOpRWOXI]
There are some very good tips on the video on hiking clothing. Some of the key points are:
For men
- Wear pants that can be converted into shorts
- Do not wear any cotton as it absorbs moisture
- Use clothes made of breathable material
- In cold weather wear lightweight clothing in layers
For Women
- One bra is sufficient because you’ll be able to wash it
- Bring along a pack towel
- You can use you unused clothing as pillow stuffing
- No cotton
- Tank top recommended
- Hat recommended
- Wear pants that convert into shorts (like the men’s above)
- Liner socks are important
- Invest in high quality socks and boots
- Fleece for cold weather
How comfortable a backpack is depends on how well it fits, how it’s packed and how heavy it is.
I don’t know if you noticed this but hiking backpacks come in different sizes and the that is right for you is based on your torso measurement.
Check out the video from REI on how to measure your torso length.
[media:http://www.youtube.com/watch?v=1l1TsGXydWU]
When I was just starting out hiking and camping I used to pack my sleeping bag loose into the backpack or even tie it on the outside. It took me 3 trips before I started using stuff sacks to store my sleeping bag. These cylindrical shaped nylon, usually waterproof, enclosures protect your bag from unnecessary wear and tear and also from the rain.
Material
Most stuff sacks are made of newer fabrics like coated polyester and ultralight silicone-impregnated nylon.
While the material itself is waterproof, the drawstring closure in most stuff sacks is not so be careful about getting it into water and if you tie your sleeping bag to the outside of your backpack make sure you at least cover the drawstring closure with a waterproof material to protect against rain. A plastic bag will do in most cases.
Newer stuff sacks like the eVac Dry Sack from Sea To Summit don’t use drawstring closures but instead you roll the sack down and then close the buckle. This accomplishes two things. First, when you roll the sack down air is pushed out of the base so water can’t get in. Second, it allows you to save both space and weight. The weight saving though is not such a big deal. You only save a little bit of weight but the space saving is much appreciated.
The lightest stuff sacks are made of silicone-impregnated nylon parachute cloth. It can be as light as 0.5 oz or even less. GoLite employs this type of material and they made an improvement to the drawstring closure by adding a collar instead of just a drawstring and flap configuration. Outdoor Research on the other hand uses a good waterproof fabric called Hydroseal. This fabric is tough and can handle rough use but still limp enough to mold itself to the contents of the sack. This stuff sack is available in the drawstring-flap configuration as well as roll closure secured with Velcro bindings.
Compression and Size
Most stuff sack suppliers have some sort of compression model with straps, laces or double drawstrings that reduces the volume by up to half. You can also stuff in your down jacket or parka together with the sleeping bag into the sack. Make sure that yours is big enough for you to easily put in whatever you intend to put in.
Don’t get a small stuff sack just because you think it would save you space because in most cases you’ll just have unused, wasted space in your backpack as a result. Another problem is that even if you can cram your sleeping bag and other stuff into the sack when you’re at home, doing so in less than ideal conditions on an empty stomach with the cold wind biting at you can turn it into a monstrous task. Get one that’s big enough to take its load with extra room to spare, leaving it soft, malleable and easy to stuff. I use Outdoor Research Hydroseal DryComp Sacks but I’m thinking of getting the eVac Dry Sack from Sea to Summit for myself.
Jonsky also writes at hubpages with articles on down sleeping bags, stoves, tents and other camping gear. He is also a writer for http://www.hiking-camping-world.com. Check out the range of down sleeping bags on that site.
Article Source: http://EzineArticles.com/?expert=Jonsky_Sicuna
http://EzineArticles.com/?Using-Stuff-Sacks-For-Your-Sleeping-Bag&id=1991254
Backpacks are generally categorized into three: frameless, external frame, and internal frame. The main purpose of a frame is to support the backpack and helps to distribute the weight across your whole body, mainly on the hips so that your shoulders are not bearing all the burden.
Frameless Backpacks
This is the simplest and most inexpensive type of backpack you can find. The most basic design consist of one main pocket and connected to a set of shoulder straps. They are more used for general stuff rather than hiking. However, some are suitable for outdoor activities like hiking. Some more advanced versions have a suspension system like waist strap, chest strap and padded shoulders.
External Frame Backpacks
This is an old favorite with backpackers because of its large capacity and strong frame. The frame is very rigid and it supports a sack made of cloth or other materials.
External frames allow for users to carry a heavier weight than a frameless pack could. It also gives the wearer more support and protection and better weight distribution. The frames have been made of wood until about the middle of the twentieth century.
This type of backpack is not very common today and the frames are now made of lightweight metal tubes, often aluminum and sometimes titanium or scandium. A system of straps and pads keep the sack and frame from contacting the body so you get reduced sweatiness.
It is normal practice to strap bulky items such as camping tents, sleeping bags and pads on the frame because some parts of the frame are not occupied by the pack. The main compartment is usually small compared to internal frame backpacks to allow for these bulky items to be strapped.
The problem with external frame backpacks is the center of gravity is very high up and away from the body resulting in instability. Keeping your balance especially when climbing up hills is not an easy task with external frame backpacks.
Users also complain of getting bruises as a result of the uncushioned frame rubbing or hitting against the body. However, external frame backpacks are very durable.
Internal Frame Backpacks
Invented in 1967 by Greg Lowe, the internal frame backpack has replaced external frame backpacks as the standard pack for hikers. Greg Lowe later went on to found Lowepro, a company specializing in backpacks and other carrying solutions for various equipment.
The frame which consists of strips of metal or plastic is integrated into the pack. A system of straps works with the frame to distribute the weight.
An internal frame backpack is fitted closely to the body and therefore the load is more easily controlled and easily predictable. You have more freedom of movement and are ideal for scrambling over rocky surfaces and hiking uphill. However, the close fit presents another problem; poor ventilation and therefore sweatier backs.
Unlike external frame backpacks, there are only a few (if any) lash points for your tent or sleeping bag and there is a limit to the size of whatever you want strapped to the outside of the pack. Fortunately, modern internal frame backpacks have a large capacity so that all of your gear can fit inside.
Check out these internal frame backpacks and bivvies which are great for backpacking because they’re compact, lightweight and easy to set up compared to tents.
Article Source: http://EzineArticles.com/?expert=Jonsky_Sicuna
http://EzineArticles.com/?Backpack-Design—The-Three-Types-of-Backpacks&id=2317549
2009 is the year of camping revival some might say and they could be right. With reports flying everywhere about how big and trendy camping is, stores are having a hard time keeping up with demand for camping gear.
There are two types of camping. Wild camping is camping in the outdoors away from civilization and there won’t be any of the facilities in an organized campground. It’s also referred to as technical camping and you’re limited to what you have in your backpack.
The other type of camping is called family camping and backpacking is optional. It’s easier than technical camping and the campgrounds are usually close to lakes and rivers.
The difference between family camping and wild camping is not just about the level of difficulty and location. In wild camping, it is ideal that you have small and lightweight camping equipment. In family camping, people usually arrive in their vehicles so they can pretty much carry everything under the sun. Family campers can also use whatever they have at home as camping gear.
However, they do have at least one thing in common; tents, sleeping bags and camping cookware e.g. camp stoves are the most expensive things they need to have. And because the lighter and smaller the equipment the more expensive it is, wild campers have a bigger bill when they first start out.
For family camping, the biggest considerations for a tent are space and comfort. First it has to at least accomodate the number of people to share the tent with plus one more. In general, the more space the better the comfort.
Cabin tents have nearly vertical walls and high ceilings and often comes with bug-proof netting, large rain flies, ventilation windows and even separate rooms. This type of tent has the best headroom compared to any other type of tent.
Dome tents are smaller but they still have a good amount of headroom. They’re easier to set up and often less expensive than cabin tents. Dome tents also fare better in wind and rain because they have a low profile.
Both types of tents are heavy and bulky and therefore not ideal for backpacking. Solo hikers either go for bivvies, 1 person tents or 2 person tents if they want comfort. Dome tents are less popular with backpackers because they tend to be too heavy.
As for sleeping bags, rectangular ones are more popular with family campers because they have more room to move about in. You can also zip them together to form a double bag.
Technical campers almost always prefer mummy sleeping bags because they’re lighter in general and does a better job in keeping you warm especially if there’s a hood. There are two types of insulation in sleeping bags; down and synthetic. Down sleeping bags are lighter and more effective but it can get too hot if the temperature is not cool enough. Synthetic sleeping bags are heavier and less effective in retaining heat but they keep their insulation properties even when wet and when they do get wet, they dry very easily.
A camping mat is one of the essential camping gear because even if your sleeping bag is effective, you still lose a lot of heat to the cold ground. Family campers like to use inflatable air mattresses along with battery powered pumps. Camping cots are also a popular option.
Backpackers on the other hand love to use self-inflating pads like Therm-a-Rest. They’re lighter and packs very small.
As for camping cookware, family campers can pretty much use whatever they have at home. They often carry coolers filled with their favorite food and drinks. An open fire is better suited for barbeques but it’s still much more easier and practical to use camp stoves for general cooking instead.
Wild campers have to be careful with their camping cookware so as not to carry too much and be a burden. Non-stick pans and pots are essential for easy cleaning. Propane stoves are popular with new wild campers because they’re very easy to use.
Outdoor recreation presents a good opportunity for some people to show off their latest camping gear. It gives them a sense of pride for own such an expensive equipment even if they don’t need it.
However, the majority of my friends have never even gone camping before. This is mostly because of their fear of not having enough gear or the right gear. They think that to have the complete set of gear they need to spend a lot of money and they are not willing to spend that much especially in the recession.
Good hiking boots cost around $200, clothing could cost you about $600, a reasonable down sleeping bag costs about $200, 4-season tents can cost $600, internal frame backpacks can cost up to $500 for a good one and $100 for trekking poles. This is just some of the equipment. You might need camp stoves, flashlight, crampons, gaiters, child carriers, lantern, hammock and more.
For a lot of people, this is a lot of money. Yet there are still a lot of people who don’t have that much money to spare that enjoy hiking and camping with little problems. Manufacturers like to make you think that you need all this stuff and all the expensive features.
The truth is camping is about going back to basics. You don’t need the state-of-the-art equipment. You can even find what you need in your own home or the local thrift store.
Check out the gear tips below that can really cut your costs:
– Down parkas are very expensive and they make you sweat when you hike. Using layers will keep you warm and you can adjust if it gets too hot by removing the layers. Avoid using cotton for layers as they absorb water and makes you wet. Use synthetics and wool. Synthetics wick away water and keeps you dry. Wool keeps you warm even when it’s wet.
– For the waterproof outer shell you can use a windbreaker and make it waterproof by applying a bottle of waterproofer that will set you back a few dollars.You only need expensive parkas when you’re going for an expedition under harsh conditions.
– Use a cheap camping tent or bivvy and treat them with a seam sealer. Do this before every camping trip. You can find cheap tents just about everywhere. Remember to check for tears. Unless you’re backpacking, you don’t really need an expensive tent.
– A lightweight down sleeping bag can cost you a lot of money. A zero degree synthetic sleeping bag should be good enough for the mountains in most cases. Use a chemical warmer and some layers of clothing to keep warm inside your sleeping bag. If you’re not backpacking and weight is not an issue, you can even be without the sleeping bag. Just use whatever suitable bedding you have at home but make sure you insulate yourself from the ground.
– Blisters are your worst enemy when you’re hiking so I don’t recommend cheap hiking boots. However if you’re just camping, you can wear just about any footwear as long as you’re comfortable.
– There are still quite a few places where you’re allowed to build campfires. This eliminates the need for camping stoves. If not, there are a lot of cheap and practical stoves out there. You can either buy it new or used or you even just borrow them.
– For trekking poles you can just use a strong enough stick. I’ve used it for a few years without any problems. Some people may argue that cutting out sticks from the forest is bad for the environment but the process making those expensive trekking poles takes an even bigger toll on the environment.
This list is pretty basic but covers the most common concerns people have told me about. Camping gear doesn’t have to be overly expensive. You can and should use what you already have as much as possible.
Check out our windbreakers and compare them with parkas. Also see how expensive down sleeping bags can get.
Article Source: http://EzineArticles.com/?expert=Jonsky_Sicuna
http://EzineArticles.com/?How-You-Can-Reduce-the-Cost-of-Your-Camping-Gear&id=2310222
Women-specific sleeping bags as the name suggests are tailored to fit women a little bit better. The really big problem is that women vary is shape and sizes. Some are round, some athletic, some skinny, some curvy and more.
Sleeping bag manufacturers claim that their women-specific sleeping bag dimensions are based on the size of an average women. The problem is, most women I know are not the size of an “average woman”. So where do these “average women” come from?
Most athletic type women have problems with fitting women-specific sleeping bags because while it is made a little wider in the hips and a little narrow at the shoulders, these athlete women are a little narrow at the hips and a little wide at the shoulders.
So what am I saying?
Women-specific sleeping bags are still worth looking into despite the size problems. If it fits, why not?
I need a zero degree sleeping. Which one should I get that’s no more than $300?
Sierra Designs make really good women sleeping bags. The Winema 0 degree sleeping bag is highly recommended. Weighing 3 pounds, 12 ounces, it is made up coconut shell derivatives that are as soft as nylon. Insulation is made of the synthetic Primaloft Eco surrounded by EcoSensor recycled shell material that keeps you comfortable in damp conditions. It has got some of the features of a high end down sleeping bag.
If you want a down sleeping sleeping that is less than $300 then go for the Teton +0 by Marmot. The 600-fill goose down insulation makes it softer, warmer, lighter(3 pounds, 5 ounces) and more durable than synthetic sleeping bags. Considering that the price is about the same as the Winema, this one is a steal.
If the above two are out your range then a good cheap sleeping bag is L.L. Bean’s Katahdin Climashield Women’s Mummy. Despite the fact that the price is about half the maximum budget, this one is still a zero degree sleeping bag that’s highly rated by users. At 3 pounds, 5 ounces, it’s surprisingly light for a synthetic sleeping bag.
Also consider a sleeping pad or two to keep away the cold from the ground and for extra cushioning.

This is something I’ve stumbled upon that I think is really cool. It’s both a camping lantern and a flashlight that uses batteries that are charged by solar energy.
It uses LED so it’s energy efficient as well. There are 2 light settings; high and low.
I don’t know how bright these settings are but at a low setting, the batteries last for an hour for an hour of solar charging. I think that’ s pretty good.
For the high setting, the batteries last for half an hour for an hour in the sun. At full charge the batteries can last up to 20 hours.
It only weighs 22 ounces and that’s pretty cool. I’d love to get my hands on one of these.


Here’s where I first found it:
|